


WebSocket: An In-Depth Beginner’s Guide
Intuition and theory for real-time application development


WebSocket is a communication protocol meant to serve two-way communication between a client and server. It is a communication protocol similar to HTTP (instead of http:// or https://as URL protocol, we use ws:// or wss://). In simpler terms, WebSocket enables simultaneous sending and receiving of messages by both client and server.
It means that once an initial connection is established, the server can also push messages to the client. This is in contrast to the client-server model of HTTP, where a server cannot initiate a message transfer to a client but can only respond to an HTTP request initiated by a client.
By supporting two-way communication, WebSocket allows us to develop real-time applications where a server sends updates to a client whenever necessary. This includes applications like multi-player online games, chat applications, notifications, etc. It also reduces communication overhead by eliminating the need for the 3-way handshake for each communication.
Before we go into how WebSocket does all the above things and its intelligent modifications over HTTP protocol, let’s review HTTP and TCP.
Revisiting the TCP/IP Model
Books have been written on the TCP/IP model, so we will be revisiting the absolute necessities required for understanding WebSocket covered in this post. You may skip this section if already familiar.
TCP/IP Model is an attempt to explain how two nodes(e.g. a client and a server) communicate over the Internet. The whole communication is abstracted into four components called layers. Let us look at each of them briefly.
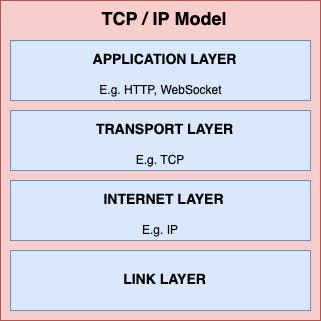
TCP/IP Model
- Link Layer: The Link layer is the lowest, and it governs how data interacts with a physical medium, e.g. Wi-Fi which defines how data is transmitted wirelessly.
- Internet Layer: While the link layer works only in a local network, it is the Internet layer that makes interlinking of networks possible. It is this layer that defines and establishes ‘The Internet’. The primary protocol in this layer is the Internet Protocol(IP), which also defines IP addresses.
- Transport Layer: This layer provides host-to-host communication, irrespective of whether nodes are in a local network or the Internet. This layer introduces the concepts of network ports, which serve as a communication channel between a client and a server. TCP is a protocol of this layer that promises that data arrives in order, has correctness, and has no duplication. Most of our traffic is served by TCP.
- Application Layer: This layer contains protocols that are used mainly by software applications like FTP(for file transfer). HTTP/HTTPS is the most popular protocol of this layer which is used in client-server configuration and is used by browsers. WebSocket also belongs to this layer.
We will look at the HTTP protocol of the Application layer in greater detail as WebSocket protocol depends on it.
The HTTP Protocol
A typical HTTP request contains the following parts:
- A request line.
- A series of HTTP headers or header fields.
- A message body, if needed.
Request Line
The first line, called the request line has the form<command> <path> <version>
Example: GET /app/index.html HTTP/1.1
Where <command> is a HTTP method identifying request type, <path> is the logical path of resource on server and <version> is the HTTP version.
HTTP Headers
HTTP headers can be considered as metadata for the request and response. It is of the format
<header name>: <header value>
Example:Accept-Language: fr, de
If-Modified-Since: Fri, 10 Dec 2004 11:22:13 GMT
The first header means that the client is requesting the resource in either French or German language. The second header requests that the document should be sent if it is modified after the given date.
There are multiple HTTP headers, governing aspects like Authentication, Caching, Cookies, and so on.
The message body is optional and is not relevant for our present WebSocket discussion. With this, we conclude our revision, and let’s look into WebSocket concepts.
Theory of WebSocket
The topics discussed in this section are to understand how browsers and servers handle WebSocket under the hood. Modern browsers and WebSocket libraries automatically handle multiple aspects discussed below.
WebSocket is a communication protocol that belongs to the Application Layer in the TCP/IP model. Owing to HTTP’s immense popularity and adoption, WebSocket uses HTTP constructs for initial connection between a client and a server.
In a WebSocket request, a client requests that once HTTP connection is established, the server should Upgrade to WebSocket connection, as defined in the Connection header(we will see this shortly). If the server accepts this upgrade, a WebSocket connection is established, and two-way communication can take place.
WebSocket Connection
This article concisely explains how WebSocket maintains a TCP connection:
WebSockets are built on top of the TCP stack as well, which means all we need is a way for the client and the server to jointly agree to hold the TCP connection open and repurpose it for ongoing communication. If they do this, then there is no technical reason why they can’t continue to use the socket to transmit any kind of arbitrary data, as long as they have both agreed as to how the binary data being sent and received should be interpreted.
This explains that if a client and a server can agree on holding a TCP connection, there is no technical limitation in two-way communication. They both also have to agree upon the communication way(JSON, XML, etc.).
Below is a sample client WebSocket request:
GET /chat HTTP/1.1
Host: server.mywebsite.com
Connection: Upgrade
Upgrade: websocket
Origin: [http://mywebsite.com](http://mywebsite.com)
Sec-WebSocket-Key: x3JJHMbDL1EzLkh9GBhXDw==
Sec-WebSocket-Protocol: mqtt, soap
The request line in the above example(the first line) is the same as in a regular HTTP request. By Connection header, the client is informing the server that it would like to upgrade the connection. This will prompt the server to look for the Upgrade header, which states that the client wishes to upgrade to the WebSocket protocol.
In addition to Upgrade headers, the client sends a Sec-WebSocket-Key header with a random browser-generated base-64 value. The intent is to prevent a caching proxy from re-sending a previous WebSocket connection. Even though it does not authenticate the connection, but ensures that any intermediate proxy is not initiating the upgrade.
The client also sends a list of sub-protocols that it understands in the Sec-WebSocket-Protocol header. Here, the client is telling the server that it can communicate using either MQTT or SOAP sub-protocol.
In response to the above request, valid server response may look like below:
HTTP/1.1 101 Switching Protocols
Upgrade: websocket
Connection: Upgrade
Sec-WebSocket-Accept: HSmrc0sMlYUkAGmm5OPpG2HaGWk=
Sec-WebSocket-Protocol: mqtt
In the above response, the server is acknowledging the protocol upgrade from HTTP to WebSocket. The response also adds the Sec-WebSocket-Accept header, which is computed from the Sec-WebSocket-Accept received in the request, using a pre-defined algorithm. This is added so that browser can confirm that the response corresponds to which request.
In the header Sec-WebSocket-Protocol, the server is also informing that which sub-protocol among the list of options it will use for further communication.
WebSocket Frames
Once a WebSocket connection is established, the communication can take place using WebSocket packages called frames. Frames are data packages that either client or server can send.
They can be of several types like text frames, binary data frames, ping-pong frames, connection close frames, etc.
WebSocket Prefix
WebSocket standard defines two prefixes ws:// and wss:// to identify WebSocket connections. The wss:// is used for secure connections. Both can be thought to their HTTP counterparts, i.e. http:// and https://. A typical WebSocket endpoint might look similar to wss://mywebsite.com/application/chat.
WebSocket enabled Application Development
So far, we have seen what WebSocket is, how it is beneficial and how a browser(client) and a server communicate to establish a WebSocket connection. Fortunately, with modern browsers and APIs, most of these things are handled under the hood. In this section, we will look at how can we integrate WebSockets into our web application.
First, let’s look at the client-side code, the one which goes into your browser. This could be React component, Django template, or a simple HTML <script> tag in your application.
The Client-side code
A client(e.g. browser) can initiate a new connection by instantiating a new WebSocket object and passing the WebSocket compliant(ws:// or wss://) endpoint.
Once a connection is established, it listens on below four events:
- open: triggered once when a new connection opens.
- close: triggered once when an existing connection closes.
- message: triggers every time a message is received from the server.
- error: triggers when an error occurs.
// New socket connection
let socket = new WebSocket("wss://medium.com/chat");

// Listens to open event on socket connection
socket.onopen = function(e) {
  alert("open trigger: New connection established");
  alert("open trigger: Sending a message to server");
  // Sending message to server
  socket.send("This is a test message.");
};

// Listens to message event(new message from server) on socket connection
socket.onmessage = function(event) {
  alert(`message trigger: Message received from server: ${event.data}`);
};

// Listens to close event on socket connection
socket.onclose = function(event) {
  if (event.wasClean) {
    // Connection close as reqeusted
    alert(`close trigger: Connection closed without any error, code=${event.code} reason=${event.reason}`);
  } else {
    // Connection died due to unknown reason
    alert('close trigger: Connection closed unexpectedly');
  }
};

// Listens to error event on socket connection
socket.onerror = function(error) {
  alert(`error trigger: ${error.message}`);
};
In the above code, we have first created a new WebSocket connection. Then we have defined listener functions for each of the four events, open, message, close, and error, respectively.
In addition to the above, there is also a socket.readyState property with the following possible values:
0 – CONNECTING: the connection is still not established.1 – OPEN: the connection is established.2 – CLOSING: the connection closing is in progress.3 – CLOSED: the connection is closed.
Let’s look at server-side code now. We have taken this example from here.
The Server-side code
Each language and web framework has library for WebSocket. For our example, we have taken Nodejs and it’s ws library. Even if you develop with some other language or framework, give below code a try as the implementation process is similar.
const http = require('http');
const ws = require('ws');

// Section 2- The WebSocket Server
const wss = new ws.Server({noServer: true});

// Section 3- WebSocket upgrade
function accept(req, res) {
  // all incoming requests must be websockets
  if (!req.headers.upgrade || req.headers.upgrade.toLowerCase() != 'websocket') {
    res.end();
    return;
  }

  wss.handleUpgrade(req, req.socket, Buffer.alloc(0), onConnect);
}

// Section 4- Sent message over WebSocket
function onConnect(ws) {
  ws.on('message', function (message) {
    ws.send("Hello from server, New User!");

    setTimeout(() => ws.close(1000, "Bye!"), 5000);
  });
}
Now let's review above code by section:
Section 1- The HTTP Server
if (!module.parent) {
  http.createServer(accept).listen(8080);
} else {
  exports.accept = accept;
}
We start by identifying if the present script is a root script or called by some other script. If it is a root script, we are creating a regular HTTP server that listens to port 8080. This server also attached function accept for received requests.
If this is not a root script, we are assuming that the root script has already created an HTTP server. In this case, we are only exporting our function accept.
Section 2- WebSocket Server
const wss = new ws.Server({noServer: true});
In this section, we are creating a new WebSocket server. The noServer mode allows the WebSocket server to be completely detached from the HTTP/S server. This is useful when we want to have multiple WebSocket servers handling different scenarios and a single HTTP server forwarding the requests.
Section 3- WebSocket upgrade
function accept(req, res) {
  if (!req.headers.upgrade || req.headers.upgrade.toLowerCase() != 'websocket') {
    res.end(); return;
  }
  wss.handleUpgrade(req, req.socket, Buffer.alloc(0), onConnect);
}
This is the definition of accept function provided to the HTTP server. This function identifies if the received request is of type WebSocket. As explained in the section Theory of WebSocket, it does so by looking for the Upgrade header and checking if its value is websocket.
If the request is not of type WebSocket, the function returns. Though if it is of WebSocket type, the function initiates the Upgrade handshake. The handleUpgrade method accepts the request, the socket, and the function to be called on success connection, in our case, onConnect.
Section 4- Sent message over WebSocket
function onConnect(ws) {
  ws.on('message', function (message) {
    ws.send("Hello from server, New User!");
    setTimeout(() => ws.close(1000, "Bye!"), 5000);
  });
}
This section defines the onConnect function passed during the request upgrade. This is the callback function to be called if an upgrade successfully happens. Here, we are doing very little use with this function, i.e. sending a message Hello from server, New User! and closing the connection.
Though our code on every new WebSocket connection sends this message and closes the connection, but in a real application, this is the place where most of our business logic will go.
This concludes our present discussion on WebSocket. I wished to include a few more topics like how a WebSocket or an HTTP connection takes server resources, how threads and processes on a server correspond to connection count, and how the same thread can serve multiple HTTP requests. But since they were not strictly related to the current topic, I will write a separate blog on this.
That’s all for this blog. Please follow for upcoming articles, thank you!
More articles from the same writer